 Save to Pinterest
 My sister called me in a panic two days before her birthday asking if I could make something that looked like it came from a fancy bakery but tasted like home. I'd never made mini layer cakes before, but there was something about the idea of building these delicate little towers that felt both doable and exciting. Standing in my kitchen that afternoon, I realized these small cakes would let me fuss over details in a way a full-size cake never could, and that's exactly what she needed.
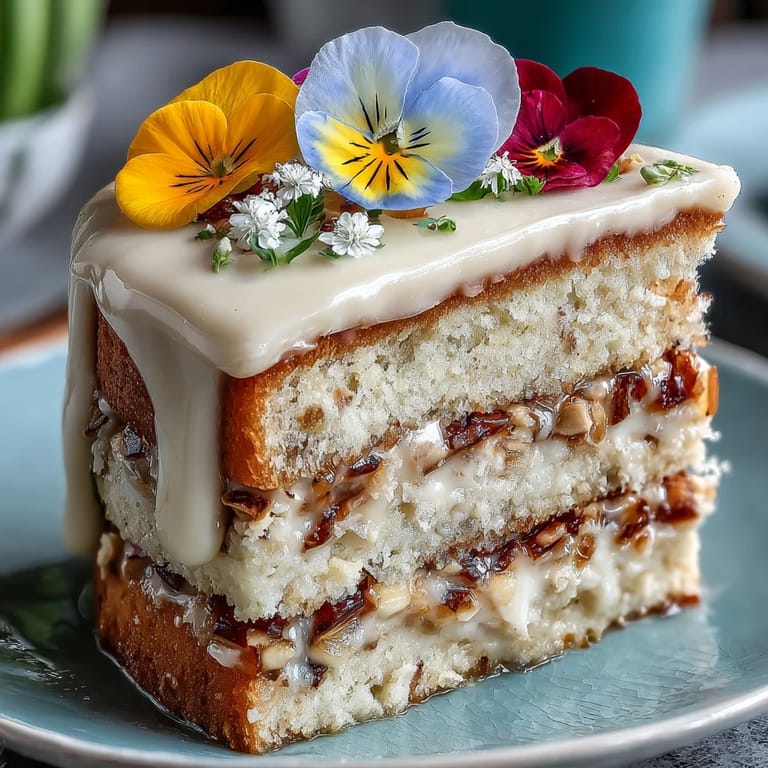
I'll never forget watching my sister's face when she saw them lined up on the table, each one a little work of art with tiny purple violas scattered across pale pink buttercream. Her friends kept taking photos before eating them, and there was this moment of pure joy where the cakes became less about the recipe and more about what they represented. That's when I understood why people care so much about making beautiful food for the people they love.
Ingredients
- All-purpose flour (1 1/4 cups): The foundation that keeps these cakes tender without being dense, and it's forgiving enough for home bakers.
- Baking powder (1 tsp): Your secret to that perfect crumb structure that holds layers together without crumbling.
- Salt (1/4 tsp): Amplifies the vanilla and lemon without anyone tasting it directly, trust this small amount completely.
- Unsalted butter for cake (1/2 cup): Room temperature butter creams properly and creates the richness that makes these feel indulgent.
- Granulated sugar (3/4 cup): Beat this with butter until it looks like wet sand, that's when you know the structure is right.
- Large eggs (2): Room temperature eggs incorporate smoothly and add lift without being temperamental.
- Pure vanilla extract (1 tsp for cake): Don't skip the word pure, it makes a flavor difference you'll notice in every bite.
- Lemon zest (1/2 tsp): Freshly zested, not the dried stuff, because that brightness is what keeps the cake from tasting one-dimensional.
- Whole milk (1/2 cup): Room temperature milk mixes in without shocking the batter and keeps things moist.
- Unsalted butter for buttercream (3/4 cup): Softened to the point where your finger leaves an indent, this is critical for smooth frosting.
- Powdered sugar (2 cups): Sifted before measuring so you're not fighting lumps while beating.
- Milk or heavy cream (1-2 tbsp): Heavy cream makes buttercream taste richer, but milk works if that's what you have.
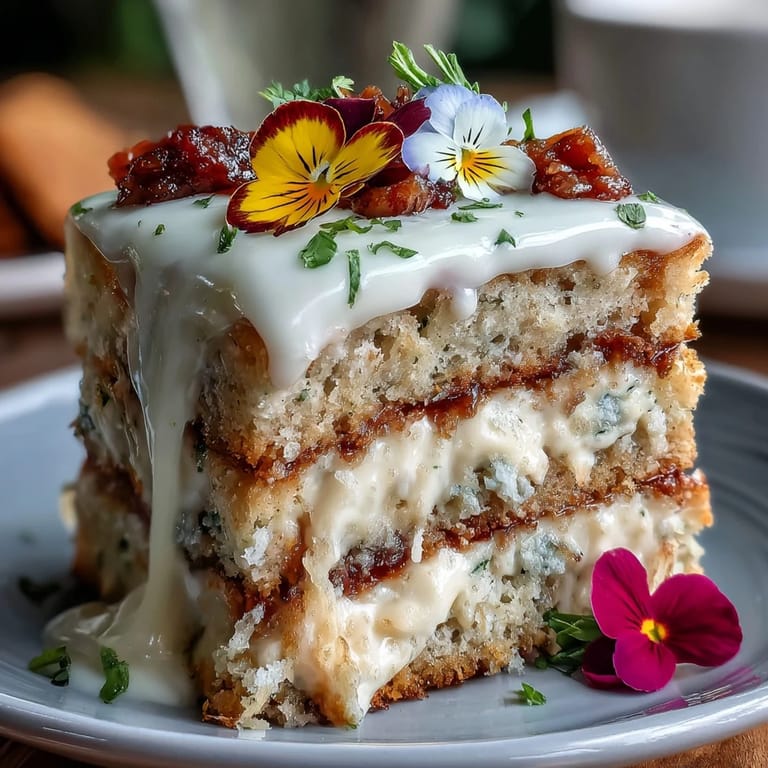
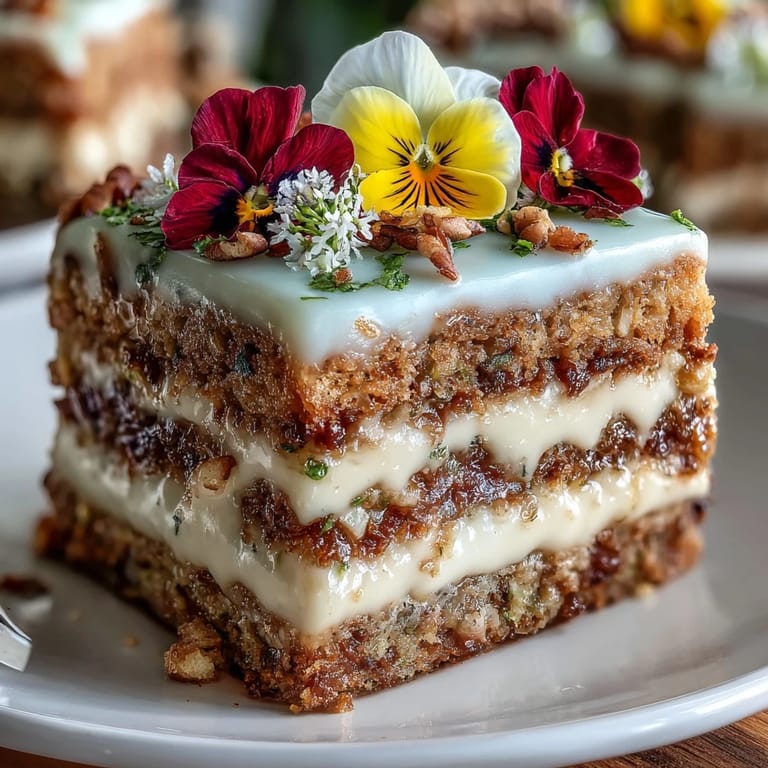
- Edible flowers (1 cup): Buy from a reputable supplier like specialty food shops or online sources that verify pesticide-free status, never pick them from a garden unless you grew them yourself.
Tired of Takeout? 🥡
Get 10 meals you can make faster than delivery arrives. Seriously.
One email. No spam. Unsubscribe anytime.
Instructions
- Prep your baking setup:
- Preheat your oven to 350°F and line a 9x13 inch rimmed baking sheet with parchment paper, then lightly grease it so the cake releases cleanly. Having everything ready before you start mixing means you won't be rushing once the batter comes together.
- Combine the dry ingredients:
- Whisk flour, baking powder, and salt together in a medium bowl, making sure there are no hidden lumps of baking powder hiding in the corners. This step prevents dense pockets in your finished cake.
- Cream butter and sugar:
- In a large bowl, beat softened butter and sugar together for about 3 minutes until it's pale, fluffy, and almost mousse-like in texture. You'll know it's ready when you lift the beaters and the mixture falls in ribbons, not globs.
- Add eggs and flavorings:
- Drop in one egg at a time, beating well after each addition so everything emulsifies properly, then mix in vanilla and lemon zest until fragrant. The mixture will look slightly curdled after the first egg, but keep beating and it smooths right out.
- Layer the wet and dry:
- Add half the flour mixture, then the milk, then the remaining flour, mixing gently after each addition and stopping as soon as you don't see streaks of flour. Overmixing at this stage develops gluten and makes the cake tough, so your restraint here directly impacts tenderness.
- Spread and bake:
- Pour the batter onto your prepared sheet and spread it into an even layer, then bake for 18 to 22 minutes until a toothpick inserted in the center comes out clean with maybe a crumb or two. The cake is done when the edges are golden and it springs back slightly when you press it lightly.
- Cool and cut:
- Let the cake cool completely on the baking sheet, then use a 2.5 to 3 inch round cutter to punch out 12 circles, re-rolling any scraps gently to get the most cakes possible. You need two rounds per mini cake, so 12 circles makes six perfect little layer cakes.
- Make the buttercream:
- Beat softened butter until creamy and pale, then gradually add sifted powdered sugar while continuing to beat, mixing in vanilla and a pinch of salt. Add milk a tablespoon at a time until you reach a spreadable consistency that's light and fluffy, not dense.
- Tint if desired:
- If you want colored buttercream, add food coloring drop by drop to the finished frosting and beat until the color is even, keeping shades pastel so they look springlike and soft. Divide into separate bowls if you're making multiple colors.
- Assemble the mini cakes:
- Place one cake round on your serving plate or cake board, spread with a thin layer of buttercream, then top with a second round and add another thin layer of frosting on top. Think of it like building a tiny sandwich where the frosting is the glue holding everything together.
- Decorate with flowers:
- Pipe or spread more buttercream on top of each assembled cake, then gently place edible flowers on top in whatever arrangement feels beautiful to you. Some people make neat patterns, others scatter them artfully, and both look equally lovely.
- Chill before serving:
- Pop the finished cakes into the refrigerator for at least 15 minutes so the buttercream sets and the structure firms up, making them easier to handle and more pleasant to eat.
 Save to Pinterest
 The best part wasn't the taste test or even the compliments, it was my sister texting me a week later saying she kept the photo of those cakes as her phone background because it reminded her that someone spent an afternoon thinking about making her feel special. That's really what these little cakes are for.
Why These Cakes Work for Celebrations
Mini cakes solve a problem that full-size cakes never quite do, which is that everyone feels like they get something entirely their own. There's psychology in that, a sense that the baker saw each person as worth individual attention. Plus practically speaking, they photograph beautifully, they're easier to portion, and people eat them faster so you're not fighting food waste after the party ends.
About Edible Flowers
The first time I bought edible flowers, I was shocked at how delicate they are and how quickly they bruise, so I learned to handle them with tweezers rather than my fingers. I also discovered that some flowers taste mildly bitter or floral in a way that catches people off guard, so I tend to stick with mild-flavored varieties like violas and pansies that are pretty without being assertive. If you're nervous, order a small quantity first and taste a petal so you know what you're serving before it goes on a cake.
Make-Ahead Strategy and Storage
These cakes stay fresh in the refrigerator for about two days, which means you can bake and assemble them the day before a party and spend the morning on other details. If you want to get really ahead, bake the cake layers alone and freeze them for up to a week, then thaw them before assembling. The buttercream can also be made ahead and refrigerated, though you'll need to re-whip it for five minutes before spreading because it firms up in the cold.
- Store assembled cakes in an airtight container in the refrigerator, layering parchment between them if stacking.
- Add edible flowers just before serving so they stay pristine and don't wilt into the frosting.
- If your kitchen is warm, keep the cakes chilled until the last moment before bringing them to the table.
 Save to Pinterest
 These mini cakes taught me that celebration food doesn't need to be complicated to be meaningful, it just needs intention and a little care. Make them for someone you want to make smile.
Answers to Recipe Questions
- → What types of edible flowers work best for decoration?
Violas, pansies, and nasturtiums are excellent choices as they are food-safe and add vibrant color and subtle flavors.
- → How can I ensure the cakes stay moist?
Lightly brushing the cake layers with citrus syrup before assembly adds moisture and enhances the lemon flavor.
- → Can the buttercream be tinted with colors?
Yes, adding pastel food coloring to the buttercream creates a festive look without altering its creamy texture.
- → What is the ideal size for each mini cake layer?
Cut rounds about 2.5 to 3 inches in diameter using a round cutter for uniform mini cakes.
- → How long should the mini cakes chill before serving?
Chill the assembled mini layer cakes for at least 15 minutes to set the buttercream and enhance texture.