 Save to Pinterest
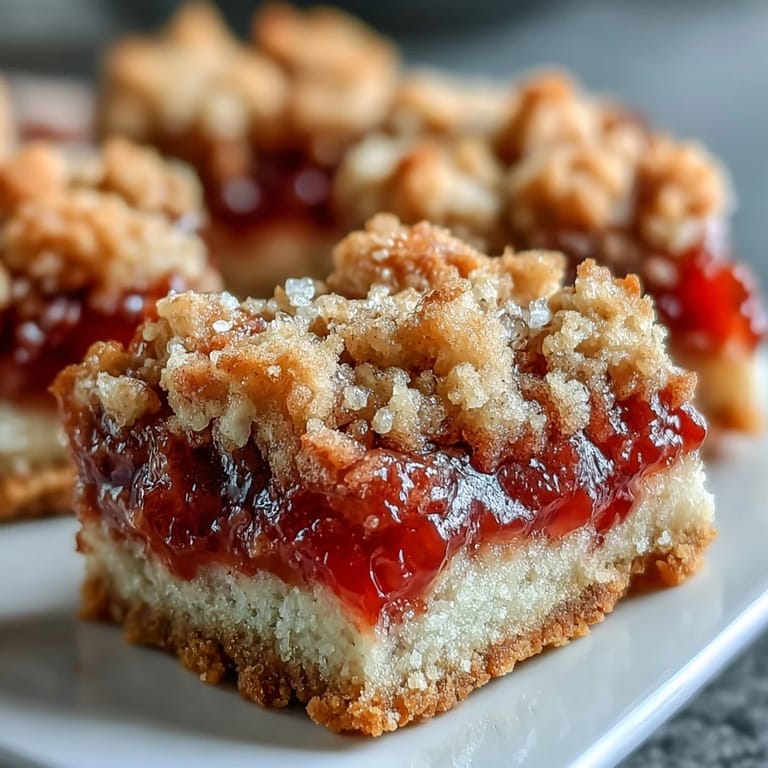
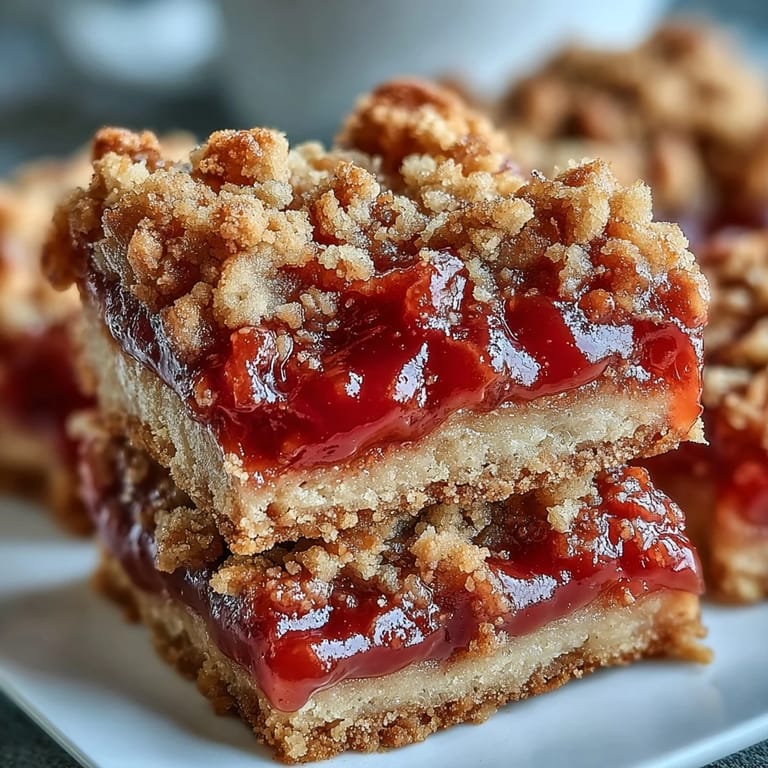
 My friend Maria brought a tin of these to a potluck last summer, and I watched them disappear faster than anything else on the table. When she finally shared the recipe, I realized the magic wasn't complicated at all—just butter, jam, and the kind of simple logic that makes you wonder why you hadn't thought of it before. The first batch I made filled my kitchen with this buttery, jammy warmth that had my neighbors knocking on the door within minutes. There's something about layered bars that feels both homey and impressive, and these tropical ones especially have a way of turning an ordinary Tuesday into something worth celebrating.
I made these for my daughter's school bake sale, and the teacher came back asking for the recipe because apparently every single bar sold before the first recess was even over. That moment of seeing something you made bring that kind of simple joy to people—that's when baking stops being a chore and becomes something you actually look forward to doing again.
Ingredients
- All-purpose flour (2 cups): This is your structural foundation, and it needs to be measured carefully—I learned the hard way that spooning it into the cup instead of scooping makes these bars denser than intended.
- Granulated sugar (1 cup): It sweetens the base without overpowering the jam, and the grittiness helps create those lovely crumbs.
- Baking powder (1/2 teaspoon): Just enough to give the bars a delicate lift without making them cake-like.
- Salt (1/4 teaspoon): This tiny amount is the secret weapon that makes the guava flavor sing instead of fade into the background.
- Unsalted butter, cold and cubed (1 cup): Cold butter is non-negotiable here—it creates those beautiful crumbles that make the texture so special, so don't skip chilling it first.
- Large egg (1): Just enough to bring the dough together without making it wet or dense.
- Vanilla extract (1 teaspoon): A quiet supporting player that rounds out the tropical vibe.
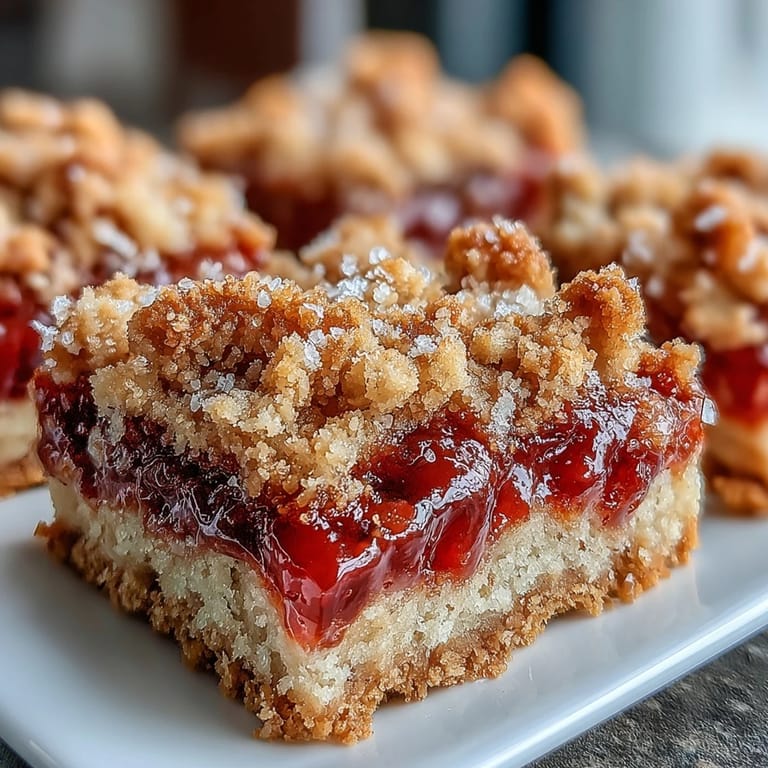
- Guava jam or paste (1 cup): The star of the show, and if you can find the real stuff from a Latin market, it's worth the trip—the flavor difference is remarkable.
Tired of Takeout? 🥡
Get 10 meals you can make faster than delivery arrives. Seriously.
One email. No spam. Unsubscribe anytime.
Instructions
- Set Up Your Stage:
- Preheat your oven to 350°F and line an 8x8-inch pan with parchment paper, making sure it overhangs the edges so you can lift everything out cleanly once it's baked. This small step saves you from the frustration of trying to pry bars out with a spatula later.
- Make Your Dry Mix:
- Whisk together flour, sugar, baking powder, and salt in a large bowl—this distributes the leavening evenly and keeps your bars tender rather than tough. The whisking motion also adds a little air, which matters more than you'd think.
- Cut In the Butter:
- Add cold, cubed butter and use a pastry cutter or your fingertips to blend until it looks like coarse crumbs with some pea-sized pieces still visible. This is where the magic happens—those butter pieces create pockets that make the bars so wonderfully crumbly and tender.
- Bring the Dough Together:
- Stir in the egg and vanilla extract until just combined—you'll feel the dough start to hold together, but it should still be quite crumbly. Don't overmix or you'll end up with tough bars instead of tender ones.
- Press in the Base:
- Take about two-thirds of the dough and press it evenly across the bottom of your prepared pan, using your fingers or the bottom of a glass to create a firm, even layer. This becomes your foundation and needs to be compact enough to hold the jam without falling apart.
- Spread the Guava Layer:
- Gently spread the guava jam over the base, leaving a small border so the jam doesn't touch the sides of the pan—this prevents it from caramelizing too much during baking. The jam will soften in the oven, so a thin, even spread is all you need.
- Add the Streusel Top:
- Crumble the remaining dough evenly over the jam layer, letting the pieces fall where they may—this rustic, uneven topping is part of the charm and bakes up golden and crisp. Don't press it down or you'll lose that lovely texture.
- Bake Until Golden:
- Slide into the oven for 35 to 40 minutes until the top is lightly golden and the edges are a shade darker. The bars will seem a bit soft when you pull them out, but they firm up as they cool.
- Cool and Cut:
- Let them cool completely in the pan—I know it's hard to wait, but this step is essential for clean cuts and a perfect structure. Once cooled, lift out using the parchment overhang and cut into 16 bars.
 Save to Pinterest
 There's a moment when you pull these out of the oven and the kitchen fills with this warm, jammy, buttery smell that somehow feels both humble and a little bit luxurious—like you've made something simple into something memorable. My kids actually asked for these instead of cake at their birthday, which pretty much says everything.
Tropical Twist Ideas
The beauty of these bars is how adaptable they are to whatever jam you have or love most. Mango, passion fruit, or even a combination of tropical jams work beautifully here, and you can swap the vanilla for a touch of rum extract if you're feeling adventurous—just use half a teaspoon since it's stronger. I've even tried them with raspberry jam for a completely different vibe, and they were equally delicious, which tells you the base recipe is solid no matter which direction you take it.
Make Them More Luxurious
If you want to elevate these beyond simple bars, try mixing chopped toasted pecans or almonds into the streusel topping—about half a cup stirred in right before sprinkling adds wonderful texture and a nutty depth that plays beautifully against the sweet jam. Some people toast the crumble topping for an extra five minutes on a separate baking sheet before layering it, which gives it extra crunch, though I'll admit this is a detail I usually skip because the bars are perfect without it. Serving them warm with a scoop of vanilla ice cream is probably the best decision you can make, and it turns something already good into something people actually dream about.
Storage and Make-Ahead
These bars keep beautifully in an airtight container at room temperature for up to five days, though they rarely last that long in my house. You can also bake them a day or two ahead, which is perfect if you're bringing them somewhere—they actually taste even better after the flavors have melded overnight. If you want to get really ahead, you can freeze the unbaked bars (right after you've added the streusel topping) and bake them straight from the freezer, adding about five extra minutes to the baking time.
- Store cooled bars in an airtight container with parchment paper between layers to prevent sticking.
- These freeze beautifully for up to three months, either baked or unbaked.
- Let frozen baked bars come to room temperature before serving for the best texture.
 Save to Pinterest
 These guava jam bars have quietly become one of my most-requested recipes, the kind of thing people text asking for before they even finish the last one. There's real comfort in knowing you can make something this delicious with such straightforward ingredients and technique.
Answers to Recipe Questions
- → Can I use other fruit jams besides guava?
Yes, you can substitute guava jam with apricot, raspberry, mango, or any other fruit preserve you prefer. The baking time remains the same regardless of the jam variety used.
- → How should I store these bars?
Store the cooled bars in an airtight container at room temperature for up to 3 days. For longer freshness, refrigerate for up to a week or freeze individually wrapped bars for up to 3 months.
- → Why is my dough too sticky or dry?
If the dough is too sticky, chill it for 15-20 minutes before pressing into the pan. If too dry, add 1-2 teaspoons of cold water or milk. The butter temperature is crucial—work quickly to keep it cold.
- → Can I make these bars gluten-free?
Yes, substitute the all-purpose flour with a 1:1 gluten-free flour blend containing xanthan gum. The texture may be slightly more tender, but the flavor remains delicious.
- → How do I know when the bars are done baking?
The bars are ready when the streusel topping is lightly golden and the edges are set. The center may still appear slightly soft but will firm up as it cools. Avoid overbaking or the bars will become dry.